
You face the toughest driving conditions after dark: visibility drops, glare explodes around oncoming headlights, and split‑second details get lost just when you need them most. Suppose you’ve ever reviewed unusable footage—blurry plates, washed‑out frames from headlight bloom, or gaps where a parking‑lot hit‑and‑run should’ve been—you know the pain. That’s why low‑light performance, more than flashy extras, decides whether a dash cam becomes real evidence or just another gadget. In this article, you’ll learn how sensors, optics, exposure control, infrared assistance, and parking features work together to deliver crisp nighttime video. We’ll also point to what to look for in a dash cam without turning this into a sales pitch so that you can make confident, time‑proof choices.
What a Dash Cam Brings to Modern Night Imaging
Without getting promotional, it’s useful to know why brand choices matter at night. Recent models like the Vantrue dash cam, in this lineup, pair high‑sensitivity STARVIS/STARVIS 2 sensors with HDR processing, IR‑assisted cabin capture, and buffered parking safeguards. The combination targets your real‑world pain points: readable plates under mixed lighting, interior visibility in complete darkness, and context preserved before and after a parking event. Use the checklist later in this article to evaluate any model—including (or beyond) this brand—against the same criteria.
Why Night Performance Matters
After dark, road scenes swing from deep shadow to blinding highlights. You need a camera that holds onto detail at both extremes so plates, faces, and signs remain legible when the unexpected happens. Great low light gear isn’t just about brightness; it’s about control—balancing exposure, keeping noise down, and avoiding the smearing or bloom that ruins crucial frames.
Coverage at night vs. day
Wide coverage helps at noon, but at midnight it’s essential. Overlapping fields of view (front, interior, and rear) give you context when headlights, taillights, and streetlamps create harsh contrast. If you often park curbside or in lots, a fourth channel can catch side swipes and walk‑ups that single‑ or dual‑channel rigs miss.
Key takeaways for a night‑ready setup
Prioritize the front channel’s sensor and HDR first, then ensure you have rear and (if you carry passengers) cabin coverage. If you park on‑street regularly, buffered parking capture is just as important as driving footage.
Image Sensors: Sensitivity Drives Night Clarity
Back‑illuminated sensors marketed as STARVIS or STARVIS 2 stand out because they gather more light with less noise. In practical terms, that means cleaner shadows, more natural color at dusk, and fewer missed plates at real‑world speeds.
STARVIS and STARVIS 2 CMOS sensors
You benefit most when the front camera uses a modern STARVIS 2 sensor, like the Vantrue dash cams. It extends dynamic range and preserves fine detail across headlights, reflective signs, and dark pavement. You’ll see steadier plate legibility and fewer “blown out” hotspots in tunnels and under signage.
Earlier, STARVIS (IMX) still delivered
First‑generation STARVIS IMX sensors remain capable after dark. If you’re shopping across budgets, an older IMX‑equipped rear or cabin camera can still perform well when paired with good optics and HDR processing on the front channel.
What to check on the spec sheet
Look for an explicit sensor ID on the front camera (for example, IMX678 on newer 4K units). It’s a quick proxy for night sensitivity and dynamic range, and an easy way to compare models.
Optics: Aperture and Lens Design
Aperture size
A faster lens (e.g., f/1.4–f/1.8) pulls in more light, so you can keep shutter speeds higher and motion blur lower. That’s the difference between reading a plate at 45 mph and watching it smear into white streaks.
Field of view
Aim for roughly 155°–165° on each channel. Wider perspectives capture adjacent lanes and sidewalks without bending geometry so much that plates become tiny or distorted near the edges.
CPL (polarizing) support
A circular polarizer reduces windshield reflections from dashboards and wet roads. At night or in the rain, it helps tame flare around streetlights and headlight glare that otherwise washes out detail.
Exposure and Processing: HDR/WDR for High‑Contrast Scenes
Headlights next to asphalt create such a stark contrast that it overwhelms basic exposure. High dynamic range (HDR) blends exposures or leverages sensor‑level tricks to hold onto bright and dark regions in the same frame. You’ll notice clearer signage, less haloing around headlights, and better plate capture on the car behind you.
HDR/WDR across channels
You’ll get the biggest win on the front camera, but having HDR or WDR on the rear helps when following cars run high beams. If interior video matters (rideshare, fleets), pairing IR illumination with HDR keeps faces recognizable without flooding the cabin with visible light.
Rear‑view considerations
Rear views face constant headlight glare. A modest FOV and HDR on that channel preserve plate characters and bumper details instead of blooming into white rectangles.
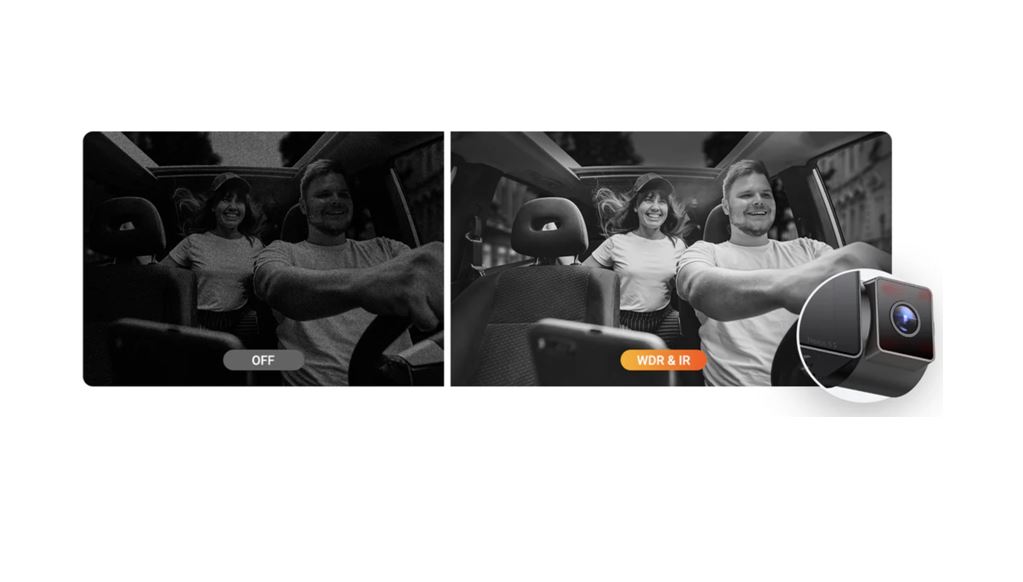
Infrared Illumination: Interior Night Capture
IR LEDs for cabins
If you drive passengers at night, you need IR‑assisted cabin video. Infrared LEDs let the camera “see” in total darkness without distracting anyone, producing clean black‑and‑white footage that still shows faces and interactions clearly.
Sensor pairing
IR works best with sensitive sensors. When IR meets a STARVIS‑class device, you’ll get sharper interior frames with less noise and fewer motion artifacts when someone moves across the cabin.
Resolution, Frame Rate, and Channel Mix
Typical night configurations
Multi‑channel systems spread processing across cameras. Expect the front channel to run at higher resolution (often 4K) when fewer channels are enabled, and for interior/rear channels to settle around 1080p–2.5K when all streams record together. That’s normal—and worth the trade for complete coverage.
Practical notes for setup
Use higher bitrates for your daily commute when you want maximum front detail, and consider lowering the cabin or rear resolution only if storage is tight. If you drive mostly at night, keep HDR enabled, and avoid overly aggressive noise reduction that can smear plate edges.
Night Parking Surveillance: Capturing After‑Hours Events
Buffered motion detection
Buffered parking modes write a few seconds before the trigger, so you don’t miss the approach, not just the impact. Those pre‑event moments are often the difference between identifying a suspect and guessing.
Low‑bitrate and low‑frame‑rate options
To hold overnight coverage without burning your card, continuous low‑bitrate recording at a reduced resolution (e.g., 720p/15 fps) or time‑lapse at one fps keeps a breadcrumb trail of activity with minimal storage.
Storage headroom
More channels and HDR eat space. Newer models support up to 1 TB microSD, while earlier units cap at 512 GB. If you rely on nightly parking mode, start at 256 GB or more and set loop durations that fit your routine.
Rear and Exterior Modules: Night‑Specific Details
Rear cameras
Look for HDR or WDR on the rear channel and a FOV near 160°. This combination helps keep following‑car plates legible even when brake‑light reflections and high beams spike.
Channel consistency
If your rear module installs outside the cabin, check for an IP rating (for example, IP67). Weather‑sealed modules resist fogging and water intrusion that can blur night footage when you need it most.
Your Quick Evaluation Checklist
| Area | What to look for | Why it matters at night |
| Sensor | STARVIS 2 on the front, STARVIS on the rear/cabin | High sensitivity and dynamic range preserve detail in shadows and under headlights |
| Optics | f/1.4–f/1.8 lens, 6‑element glass | Faster lenses cut motion blur, so plates stay readable |
| Processing | HDR/WDR on front (ideally rear, too) | Tames the headlight bloom and holds mid‑tone detail |
| Cabin | IR LEDs (≥4) | Clean interior evidence without visible lighting |
| Parking | Buffered events + low‑bitrate/1‑fps options | Captures the approach and saves space overnight |
| Storage | 512 GB–1 TB support | Longer retention when you use multi‑channel HDR |
| Extras | CPL filter, 5 GHz Wi‑Fi, supercapacitor power | Fewer reflections, faster transfers, reliable power |
Conclusion
After dark, you win clarity by stacking the right fundamentals: a sensitive front sensor, a fast lens, and HDR tuned for high‑contrast scenes. Add IR for the cabin, a sensible FOV on the rear, and buffered parking with room to spare on the card, and you’ll have video that actually holds up when it matters. Use the checklist before you buy or tweak settings, and you’ll spend less time scrubbing unusable clips—and more time with clear, actionable evidence the moment you need it.